

Facing black lines on laptop screen Lenovo can be frustrating. These dark horizontal or vertical bands often appear unexpectedly and may grow worse over time. Whether your Lenovo is a ThinkPad, IdeaPad, Legion, or any other model, this detailed guide will explain why these lines appear and how to troubleshoot them. We’ll cover common causes, step-by-step fixes, and prevention tips to help you get your display back to normal.
Black lines on a Lenovo laptop screen example
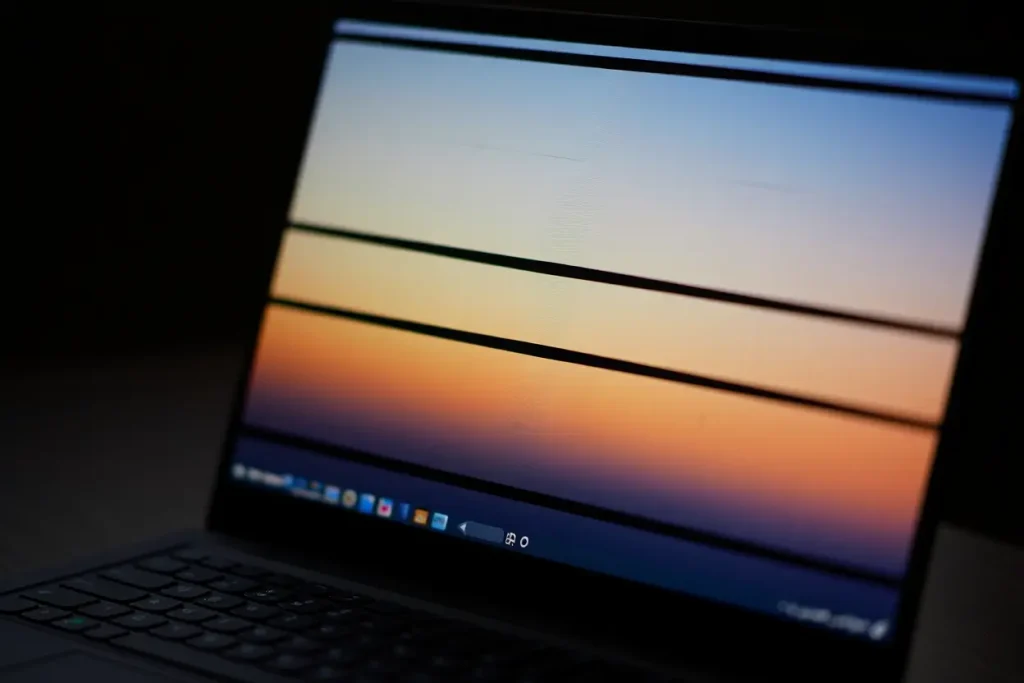
A Lenovo laptop screen showing visible black lines (horizontal and vertical). This illustrates how display issues can look; your symptoms may vary.
Laptop display problems are common enough that searching for black lines on laptop screen Lenovo yields many support threads and articles. In this guide, we break down the issue into clear sections: causes of the problem, DIY fixes, when to repair or replace your screen, and how to avoid future display damage. We also answer frequently asked questions (FAQs) about Lenovo screen lines.
Table of Contents
Common Causes of Black Lines on Lenovo Laptop Screens
- Loose or Damaged Display Cable: Inside every laptop, a thin ribbon cable connects the screen to the motherboard’s graphics circuit. Over time or with jostling, this cable (sometimes called an LVDS or eDP cable) can work loose or become damaged. Even a slightly bent or unseated cable can cause black lines or flickering on the display. A telltale sign is if the line changes when you gently move or tilt the screen – this suggests a poor cable connection.
- Faulty Graphics Card / GPU: Although less common than cable issues, a failing GPU or graphics processing unit can also cause lines. If the graphics chipset is overheating or failing, it may output corrupted signals, leading to stripes on the screen. This usually affects the entire display, so you might see lines both on your laptop and any connected external monitor if the GPU is at fault.
- Outdated or Corrupted Graphics Drivers: Sometimes software is the culprit. Outdated or corrupted GPU drivers can cause display anomalies, including lines or flickering. If you recently updated Windows or graphics drivers and suddenly got black lines, this could be the reason. However, note that if lines appear even before Windows loads (for example, in the BIOS or boot menu), drivers are unlikely the cause, since those lines are generated by the hardware itself.
- Incorrect Display Settings (Resolution/Refresh Rate): Occasionally, a misconfigured screen resolution or refresh rate can create odd artifacts. If your Lenovo is set to a non-native resolution or an unsupported refresh rate, the LCD panel may not render properly, resulting in lines or weird visual glitches. Always keep your display set to the recommended (native) resolution and refresh rate for your specific screen.
- Physical Screen Damage: Any impact, pressure, or bending of the laptop lid can crack the LCD glass or damage internal layers. Even a tiny crack in the panel can manifest as a solid black line. Similarly, if the screen has been flexed while closed or had an object press against it, you might see permanent black bars. A pressure test (gently pressing around the frame) can reveal this: if pressing near the line causes it to flicker or shift, the LCD panel or its connectors are likely damaged.
- Stuck or Dead Pixels (Column/Row Failure): Rarely, a column of pixels can fail on an LCD, appearing as a single vertical black stripe. This usually indicates a manufacturing defect or age-related failure of the panel’s driver circuits. Such pixel column failures are effectively a hardware fault.
- Image Retention or Panel Burn-In: Although more common in OLED or AMOLED screens, leaving a static image on the screen for very long can sometimes leave a faint black or colored line (burn-in). This is unlikely on newer Lenovo LCDs, but older LCD panels can show “ghost” images or lines if the same graphics are displayed constantly (for example, a black sidebar in a game). If you notice lines only when displaying certain static content, try changing the image or turning off the display for a while to see if the line fades.
- Overheating or Electrical Issues: Excessive heat or power surges can damage screen circuitry. If your Lenovo is overheating or had a recent power spike (perhaps due to faulty charger), it might cause the display or its controller to fail. Use a surge protector and keep air vents clear to avoid such problems.
In many cases, black lines on laptop screen Lenovo are due to a combination of the above issues – for example, a worn cable coupled with an aging screen. Below we discuss how to diagnose and fix each scenario.
How to Fix black lines on laptop screen Lenovo
When black lines appear, follow these troubleshooting steps in order. Each step can help you identify the root cause.
- Reboot and Perform a Power Drain: Start simple. Shut down your Lenovo completely. Unplug the charger and remove the battery if possible (for older models with removable batteries). Press and hold the power button for about 10–20 seconds. This drains residual power (static charge) that might be affecting hardware. Then reconnect power and turn it on. A power reset can sometimes clear up transient display issues.
- Test with an External Monitor: Connect your laptop to an external display via HDMI or DisplayPort. Power on both devices. If the black lines appear on the external monitor as well, the problem is likely in the GPU or motherboard, not the laptop’s built-in screen. If the external display is clean and only the laptop’s panel shows lines, the issue is almost certainly in the laptop’s display assembly (cable, panel, or connectors). This simple test narrows down the cause dramatically. Lenovo support often recommends this step to users reporting lines.
- Check Display Settings: Ensure your graphics drivers are up to date. Use Lenovo Vantage (Lenovo’s own utility) or the Windows Device Manager to update your Intel, NVIDIA, or AMD display drivers. After updating, restart and see if the lines persist. Also, go to Windows Display Settings and set the screen resolution and refresh rate to the recommended (native) values for your laptop. Sometimes selecting the wrong refresh rate can cause horizontal or vertical artifacts.
- Inspect and Reseat Display Cable (Advanced): If you’re comfortable opening your laptop, you can check the internal video cable. (If not, skip to step 6.) Shut down and power off the laptop. Remove the back cover with a small Phillips screwdriver. Carefully locate the ribbon cable that runs from the motherboard to the back of the screen. Unplug it and reseat it firmly on both ends (some Lenovo models have small flip latches on the connector that you need to open). While the laptop is open, check for any kinks or damage to the cable. Reassemble and test. Warning: This step can void warranty and may damage your laptop if done improperly.
- Check Screen in BIOS/Pre-boot: Restart the laptop and immediately enter the BIOS setup (usually by pressing F2, F1, Del or a similar key on boot). Observe whether the black lines are visible on the BIOS screen. If the lines appear even in BIOS (before any software loads), that’s a clear sign of hardware failure in the display or cable. If they only appeared in Windows after booting, software or drivers could be involved.
- Perform a Gentle Bezel Pressure Test: With the laptop on (and hopefully powered off or in a safe mode), turn the screen backlight on (you might need to force Windows to display by pressing Fn+F7 or connecting to power). Gently press along the edge of the screen near where the lines appear. If the line flickers, moves, or disappears under pressure, this strongly suggests a loose or damaged internal ribbon cable. A permanent line that doesn’t respond to pressure usually means the LCD panel itself is cracked or failing. Be careful: Do not press too hard or you could make the damage worse.
- Driver Rollback (if applicable): If the lines began after a recent graphics driver update, try rolling back to a previous version. You can do this via Device Manager by uninstalling the current display driver and letting Windows revert to the older one. Restart and test. Some users find that certain driver updates introduce display bugs, so this can resolve very rare cases.
- Connect, Clean, and Reset BIOS/EC: Ensure no external devices (USB drives, dongles) are causing conflicts. If the laptop still has issues, try updating or resetting the BIOS (using Lenovo’s support site). Some Lenovo models allow clearing the Embedded Controller by holding power with battery removed. Check your specific model’s support page for any special reset procedures.
If none of the above resolves the issue, it’s likely a hardware fault requiring replacement of parts: either the internal display cable or the LCD panel itself.
When to Repair or Replace Your Lenovo Screen
If troubleshooting suggests a hardware failure (lines visible in BIOS, no external display issue, or serious physical damage), then repair or replacement is the next step. Consider the following:
- Warranty Check: First, check if your Lenovo laptop is still under warranty. If so, contact Lenovo or the retailer. Display hardware is often covered if the damage was due to a manufacturing defect (though accidental damage usually isn’t covered). Providing your serial number may qualify the repair for free or discounted service.
- Cost of Replacement: Display assemblies vary by model, but replacement costs are often moderate. Aftermarket LCD panels for Lenovo laptops can range from ~$40 to $100 for common models. For example, one user reported finding a replacement ThinkPad or IdeaPad screen for around $50 (depending on size and resolution). A professional repair shop might charge $80–$150 total for labor. Authorized Lenovo service centers can be more expensive, often $100+ labor plus parts. If you opt for DIY, factor in tools (small screwdriver set, spudger) and care. Reputable sites like laptopscreen.com often list compatible screens by model.
- DIY Replacement: If you have some tech skills and can find the correct screen part, replacing the LCD can be done. Service manuals (often available online) describe the process. For example, the Lenovo IdeaPad 5 Hardware Maintenance Manual shows how to detach the bezel and replace the LCD panel. It’s critical to follow ESD (anti-static) precautions and the manual’s steps closely. A small mistake (like damaging a connector or cable) can ruin the new screen. If you do decide to replace it yourself, have a clean workspace and keep all screws organized.
- When to See a Professional: If you’re not comfortable opening the laptop, or the issue might involve soldered components (rare), seek professional help. Authorized repair technicians have the tools and official parts to swap the panel safely. They can also diagnose if the graphics board or other components are at fault. Although it costs more, it minimizes risk to your laptop.
In summary, replacing the screen is usually the definitive fix for hardware-caused lines. Given the relatively low part cost (often under $100) and reparability of Lenovo laptops, a replacement screen is often the only way to eliminate permanent black lines.
Preventing Black Lines and Screen Issues
Once your display is fixed, take these precautions to avoid future problems:
- Handle With Care: Laptops are portable and can flex. Always open and close the lid gently, holding it near the center. Avoid putting pressure on the back of the screen. Carry your laptop in a padded case to protect it from bumps.
- Clean and Inspect: Dust and debris can infiltrate hinges and vents. Periodically clean the screen with a soft microfiber cloth and a small amount of screen-safe cleaner. Also blow out the vents occasionally. A clean chassis reduces the risk of debris-related damage.
- Avoid Extreme Temperatures: Don’t leave your laptop in hot cars or in direct sunlight. Heat can damage the LCD and other components. Similarly, avoid very cold environments where condensation could occur.
- Use Surge Protectors: Power surges can fry display circuits. Plug your laptop into a good surge protector or an Uninterruptible Power Supply (UPS) to guard against spikes.
- Regular Updates: Keep your Lenovo’s BIOS and graphics drivers up to date via Lenovo Vantage or Windows Update. Manufacturers often release updates that improve hardware stability. (That said, always reboot and check for display problems after any update.)
- Mind Your Power Settings: Set your power plan to avoid abrupt screen shutdowns. Also, disable fast startup in Windows (Fast Startup can sometimes cause black screen issues on wake). Put your laptop to sleep or shut it down properly instead of forcefully closing the lid.
- Be Wary of Foreign Objects: Never stack heavy items on top of your laptop. Even a pen or bookmark left on the keyboard when closing the lid can press into the screen and crack it.
By taking these steps, you reduce wear on the screen and its connectors, helping prevent the dreaded black lines on laptop screen Lenovo from appearing again.
Frequently Asked Questions (FAQ)
Q: Why is there a black line on my Lenovo laptop screen?
A: A black line usually means a hardware fault rather than a software glitch. On Lenovo laptops, this often means the display cable is loose/damaged or the LCD panel is cracked internally. If the line appears as soon as you power on (even before Windows loads), then the screen or its connector is likely bad. Software glitches can sometimes cause flickering lines, but a persistent solid line is almost always a hardware issue.
Q: Will updating my graphics driver fix black lines on my Lenovo screen?
A: If the lines started right after a driver update, trying an older driver could help. However, true hardware-caused lines (especially those visible in BIOS) won’t go away with a driver change. It’s still a good first step to update drivers via Lenovo Vantage or the GPU maker. But don’t be surprised if the black lines remain, indicating the screen or cable must be fixed.
Q: How do I fix a vertical black line on my Lenovo laptop screen?
A: A vertical line often points to the display cable. Steps: shut down and do a power drain, then reseat the cable if you can open the laptop. Check the BIOS to see if the line shows up there (if yes, it’s hardware). You can also try gentle pressure on the screen border; if the line blinks or disappears, a cable is loose. In many cases, replacing the cable or screen is required to permanently fix a vertical line.
Q: Is a laptop screen replacement covered by warranty?
A: It depends on why the screen failed. If it was a manufacturing defect (rare, e.g. pixel or cable failure not caused by the user), Lenovo may cover it under warranty. However, if the line is due to physical damage (like a drop or twist), most warranties exclude accidental damage. Always check your warranty status and Lenovo’s terms, and consider their accidental damage protection plans if you have them.
Q: Can I keep using my Lenovo laptop if a black line appears?
A: You usually can keep using it; data and most functions will still work. But the line may worsen, and it could start affecting productivity. Also, a failing cable or panel could short out. It’s best to address the issue sooner rather than later to avoid further damage.
Q: How much does it cost to fix black lines on a Lenovo screen?
A: Costs vary by model. DIY replacement parts for many Lenovo screens start around $40–$70. A local repair shop might charge $20–$50 labor on top of that. Authorized service centers often charge $100+ total. In practice, expect to pay roughly $50–$150 all-in for most consumer Lenovo laptops.
Q: Are black lines on laptop screens common?
A: They happen often enough, especially on older or heavily used machines. Repeated opening/closing and minor drops can loosen cables over time. Seeing one or two support threads on forums for every brand suggests it’s a common issue. With Lenovo in particular, models with full-metal lids (ThinkPads) may show these lines if twisted. But any laptop brand can develop them.
Q: What is a “vertical black screen” on a laptop?
A: “Vertical black screen” usually means a large portion of the screen is black (often after a crash or on resume). That’s different from thin black lines. If an entire side is black, it’s still often hardware (like a failed backlight or panel section). The fixes overlap: try external monitor, reset CMOS, and if unresolved, a screen replacement is likely needed.
Conclusion
Black lines on a Lenovo laptop screen are usually a sign of hardware trouble, most commonly a loose cable or a damaged LCD panel. This in-depth guide has walked through why these lines appear and how to fix them: from simple software resets and driver updates to checking the display cable and, if needed, replacing the screen.
If your Lenovo shows these lines, start with easy steps (power cycle, external monitor test, driver updates) and then proceed carefully to the more advanced fixes. In many cases, you can resolve the issue yourself by securing a new screen or cable. However, if you prefer, a professional or Lenovo service can handle the repair, especially for under-warranty machines. Remember to protect your laptop screen going forward by handling it gently and keeping your system and environment clean.
If this article helped you fix the issue, please share it and let us know in the comments how you resolved your screen problem. Your feedback helps others in the Lenovo community tackle the same issue. Stay updated on TechUpdateLab for more laptop troubleshooting guides and tech tips!
Editorial Note: This article was created by TechUpdateLab to help Lenovo laptop users troubleshoot and fix black lines on their screens. We strive to provide accurate, up-to-date, and helpful guides for all readers.
Author: TechUpdateLab.com
Recommended
- Stop Losing FP! Best Forge Calculator for FOE (2026)
- Blox Fruits Calculator- Build the Perfect Stat Setup in Seconds
- Stop Guessing Calories – Chipotle Nutrition Calculator Guide (2026)
- Online Average Calculator – Simple, Quick & 100% Free
- Peptide Calculator – Accurate & Fast Results Tool in 2026